
SharePoint ACS is retiring on April 2, 2026. Check the Microsoft announcement about this. If you or your organization has been using the old AppRegNew.aspx or AppInv.aspx pages to grant apps access to SharePoint, those permissions will stop working after that date.
The modern replacement is an Entra ID app registration combined with the Sites.Selected Microsoft Graph permission. This lets you grant a service principal read (or write) access to a specific SharePoint site, without giving it access to your entire tenant.
In this post I’ll walk you through:
Table of Contents
The native SharePoint connectors in Dataflow Gen2 require an Organizational Account (delegated authentication) and do not support service principals or workspace identity authentication. If you need to use Dataflow Gen2, you would have to embed the token request in M using
Web.Contents, which means putting the client secret in plain text. I’d recommend avoiding that for production.
A more robust alternative is to use Fabric Pipelines with a Copy activity to ingest files from SharePoint into Lakehouse files first. Pipelines are designed for file-based ingestion, support non-interactive authentication patterns reliably, and avoid the Power Query limitations around browser-based connectors and embedded secrets. Once the data is stored in OneLake, Dataflow Gen2 can operate on it using native, fully supported connectors—resulting in a more secure, stable, and maintainable architecture for production workloads.
Or use the Notebook approach instead, which I have documented in steps 4 and 5.
Step 1: Create the app registration
If you do not have permission yourself to create app registrations in Entra ID, ask an IT admin in your organization to do this for you.
Go to the Microsoft Entra admin center and navigate to Identity > Applications > App registrations > New registration.
- Name: give it something meaningful, for example
spn-fabric-sharepoint-reader-finance - Supported account types: Accounts in this organizational directory only
- Click Register
Once registered, copy the Application (client) ID and the Directory (tenant) ID from the Overview page. You will need both later.
Add the Sites.Selected API permission
- Go to API permissions > Add a permission > Microsoft Graph > Application permissions
- Search for
Sites.Selectedand click it - Click Add permissions
- Click Grant admin consent for [your tenant] and confirm (or have an IT admin do this)
Why Sites.Selected and not Sites.Read.All?
When you assign
Sites.Read.Allto an app registration, that service principal can read every site in your entire tenant. That is almost never what you want.
Sites.Selectedworks differently. It grants no access to anything by default. You then explicitly assign the app to one or more specific sites. It is the principle of least privilege, and it is the right way to do this.
Create a client secret
- Go to Certificates & secrets > New client secret
- Give it a description and set an expiry (12 or 24 months)
- Click Add and copy the secret value immediately — you will not see it again
Tip: In production, a certificate is preferred over a client secret. Certificates are easier to rotate and more secure. For this walkthrough I’ll use a client secret to keep things simple.
Step 2: Store credentials in Azure Key Vault
Never put a client secret directly in your notebook or pipeline. Store it in Azure Key Vault instead.
Create three secrets in your Key Vault:
| Secret name | Value |
|---|---|
sp-tenant-id | Your Directory (tenant) ID |
sp-client-id | Your Application (client) ID |
sp-client-secret | The client secret value |
Let your Fabric workspace read from Key Vault
Your Fabric workspace has a managed identity that can authenticate to Azure services without storing credentials anywhere. Check if the identity is enabled under the Workspace settings > Workspace identity. To use it:
- In the Azure portal, go to your Key Vault > Access control (IAM)
- Click Add role assignment and select Key Vault Secrets User
- Assign it to your Fabric workspace managed identity (search by workspace name)
If your workspace does not have a managed identity yet, enable it in Fabric workspace settings > Workspace identity.
Step 3: Grant the app access to the SharePoint site
You need to be owner of the SharePoint site or have the SharePoint Administrator or Global Administrator role in Entra ID to be able to connect to Microsoft Graph using PowerShell. If you are not the site owner and do not the admin roles in Entra ID, ask an IT admin in your organization to do this for you.
Having Sites.Selected approved at the tenant level does not give the app access to anything yet. You still need to assign it to the specific site. This is done with Graph PowerShell.
# Install if needed: Install-Module Microsoft.Graph -Scope CurrentUser
Import-Module Microsoft.Graph.Sites

# Connect with a scope that allows granting site permissions
Connect-MgGraph -Scopes "Sites.FullControl.All"

# Get the site ID
$siteId = (Get-MgSite -SiteId "yourtenant.sharepoint.com:/sites/your-site-name:").Id

# Grant read access to the app registration
$params = @{
    roles               = @("read")
    grantedToIdentities = @(
        @{
            application = @{
                id          = "<your-app-client-id>"
                displayName = "<your-app-name>"
            }
        }
    )
}

New-MgSitePermission -SiteId $siteId -BodyParameter $params
To verify it worked:
Get-MgSitePermission -SiteId $siteId | ForEach-Object { Get-MgSitePermission -SiteId $siteId -PermissionId $_.Id } | Select-Object Id, @{Name="AppName"; Expression={$_.GrantedToIdentitiesV2.Application.DisplayName}}, @{Name="AppID"; Expression={$_.GrantedToIdentitiesV2.Application.Id}}, @{Name="Roles"; Expression={$_.Roles -join ","}} | Format-List
Readis enough. If you only need to read files or list items, do not grantwriteormanage.
You might run into the error
New-MgSitePermission_Create: Access denied. A possible cause might be that this site has been migrated from an on-premises SharePoint and still has a link to a Windows AD security group instead. Your IT admin needs to “modernize” the SharePoint site and attach it to an existing cloud-only security group.
Step 4: Read an Excel file from SharePoint
Option A – Fabric Notebook
The cleanest way to read an Excel file using a service principal is through the Microsoft Graph API. The notebook below downloads the file and loads it into a pandas DataFrame.
import msal, requests, io
import pandas as pd

# 1. Load credentials from Azure Key Vault
kv_url        = "https://your-keyvault.vault.azure.net"
tenant_id     = notebookutils.credentials.getSecret(kv_url, "sp-tenant-id")
client_id     = notebookutils.credentials.getSecret(kv_url, "sp-client-id")
client_secret = notebookutils.credentials.getSecret(kv_url, "sp-client-secret")

# 2. Acquire an access token
authority = f"https://login.microsoftonline.com/{tenant_id}"
app = msal.ConfidentialClientApplication(
    client_id=client_id,
    client_credential=client_secret,
    authority=authority
)
result = app.acquire_token_for_client(scopes=["https://graph.microsoft.com/.default"])
access_token = result["access_token"]
headers = {"Authorization": f"Bearer {access_token}"}

# 3. Resolve the SharePoint site ID
site_host = "yourtenant.sharepoint.com"
site_path = "/sites/your-site-name"
site_resp = requests.get(
    f"https://graph.microsoft.com/v1.0/sites/{site_host}:{site_path}",
    headers=headers
).json()
site_id = site_resp["id"]

# 4. Download the Excel file
# Path relative to the document library root
file_path = "Shared Documents/YourFile.xlsx"

download_url = (
    f"https://graph.microsoft.com/v1.0/sites/{site_id}"
    f"/drive/root:/{file_path}:/content"
)
response = requests.get(download_url, headers=headers)
response.raise_for_status()

# 5. Load Sheet1 into a DataFrame
df = pd.read_excel(io.BytesIO(response.content), sheet_name="Sheet1")
display(df)
When you want to use a certificate instead of a client secret for authentication, use the following code:
import base64, msal
from cryptography.hazmat.primitives import hashes
from cryptography.hazmat.primitives.serialization import pkcs12, Encoding, PrivateFormat, NoEncryption

# 1. Load credentials from Azure Key Vault
kv_url        = "https://your-keyvault.vault.azure.net"
tenant_id     = notebookutils.credentials.getSecret(kv_url, "sp-tenant-id")
client_id     = notebookutils.credentials.getSecret(kv_url, "sp-client-id")
cert_pfx_b64  = notebookutils.credentials.getSecret(kv_url, "sp-certificate")

# 2. Parse the PFX to extract what MSAL needs
private_key, certificate, _ = pkcs12.load_key_and_certificates(
    base64.b64decode(cert_pfx_b64), password=None
)
private_key_pem = private_key.private_bytes(Encoding.PEM, PrivateFormat.TraditionalOpenSSL, NoEncryption()).decode()
thumbprint      = certificate.fingerprint(hashes.SHA1()).hex().upper()

# 3. Acquire an access token
app = msal.ConfidentialClientApplication(
    client_id=client_id,
    client_credential={"private_key": private_key_pem, "thumbprint": thumbprint},
    authority=f"https://login.microsoftonline.com/{tenant_id}"
)

result        = app.acquire_token_for_client(scopes=["https://graph.microsoft.com/.default"])
headers       = {"Authorization": f"Bearer {result['access_token']}"}
Note on the file path: the path is relative to the document library root, not the full SharePoint URL. If your file is in a subfolder, include it:
"Shared Documents/Reports/YourFile.xlsx".
Option B – Pipeline Copy Activity
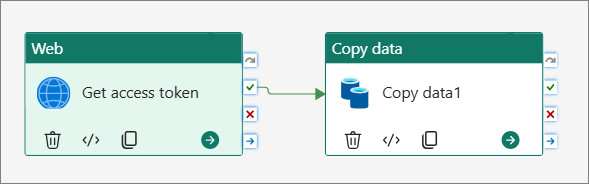
There is no simple “SharePoint Files” connector in Fabric Pipelines that supports service principal auth for Excel. The documented approach is a two-step pipeline using a Web Activity to get a token first, then a Copy Activity using the HTTP connector to download the file. As there are many examples for this, I will not go into details here.
Step 5: Read a SharePoint List
Option A – Fabric Notebook
Reuse the token and site_id from the steps above, then:
import msal
import requests
import pandas as pd
import io

# 1. Load credentials from Azure Key Vault
kv_url        = "https://your-keyvault.vault.azure.net"
tenant_id     = notebookutils.credentials.getSecret(kv_url, "sp-tenant-id")
client_id     = notebookutils.credentials.getSecret(kv_url, "sp-client-id")
client_secret = notebookutils.credentials.getSecret(kv_url, "sp-client-secret")

# 2. Acquire an access token
authority = f"https://login.microsoftonline.com/{tenant_id}"
app = msal.ConfidentialClientApplication(
    client_id=client_id,
    client_credential=client_secret,
    authority=authority
)
result = app.acquire_token_for_client(scopes=["https://graph.microsoft.com/.default"])
access_token = result["access_token"]
headers = {"Authorization": f"Bearer {access_token}"}

# 3. Resolve the SharePoint site ID
site_host = "yourtenant.sharepoint.com"
site_path = "/sites/your-site-name"
site_resp = requests.get(
    f"https://graph.microsoft.com/v1.0/sites/{site_host}:{site_path}",
    headers=headers
).json()
site_id = site_resp["id"]

# 4. Extract data from the SharePoint list
list_name = "YourListName"

url = (
    f"https://graph.microsoft.com/v1.0/sites/{site_id}"
    f"/lists/{list_name}/items?expand=fields&$top=200"
)

# Handle pagination
all_items = []
while url:
    resp = requests.get(url, headers=headers).json()
    all_items.extend(resp.get("value", []))
    url = resp.get("@odata.nextLink")  # None when there are no more pages

# 5. Load list into a DataFrame
# Flatten to DataFrame
rows = [item["fields"] for item in all_items]
df = pd.DataFrame(rows)

# Drop internal OData columns
df = df[[c for c in df.columns if not c.startswith("@")]]
display(df)
SharePoint returns a maximum of 200 items per page, so the while loop handles lists of any size automatically.
Option B – Pipeline Copy Activity
If you prefer a no-code approach, the SharePoint Online List connector in Fabric Pipelines natively supports service principal authentication, no notebook needed.
Set up the Copy Activity
- Open your Fabric Pipeline and add a Copy Activity
- Go to the Source tab
- Under Connection, click Browse all and select SharePoint Online List
- A connection wizard opens, fill in:
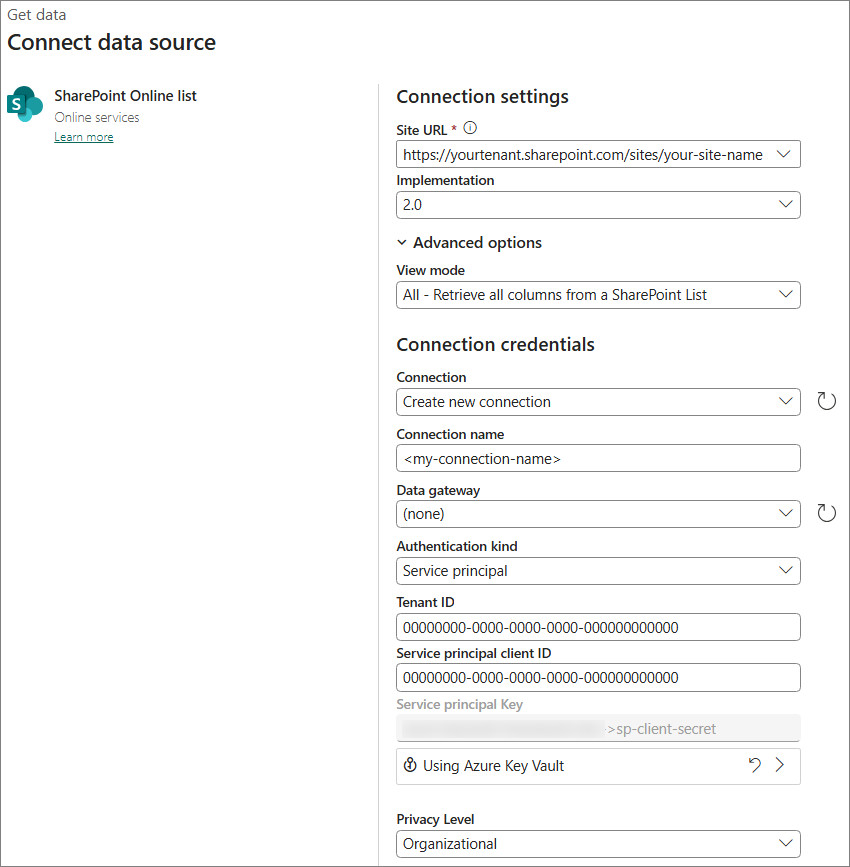
- Select the list you want to read
- Set the Sink to a Lakehouse Delta table
The Copy Activity handles pagination automatically.